Haven’t written the Buildhealth post yet, but here is a cool post highlighting neat things I’ve built at work.
AGV Controllers
We have a large robot at work to show off a lot of our different drives. See a video of it here
http://www.youtube.com/watch?v=DZIbbmZttsc
Not only did I put the electrical system together (and some of the mechanical), I also made the controller board and wrote all of the code.
AGV Controller Rev 1:
The first wireless controller was pretty rough. It was a two board design and had sliders to control the front and back actuators. It used gaming joysticks for the control, kind of video game style with one joystick for left/right and one for forward/backward. The sliders have tops on them, I just don’t remember where. I designed the placement in Autocad, then drilled and dremeled the case.
AGV Controller Rev 1 picture
AGV Controller Rev2:
Rev two took parts and ideas from a controller I built for a customer and built this beauty. It was a lot more rugged, had a larger battery, state of charge led’s, and an onboard battery charging unit. It used the large rugged joysticks. One stick was for forward/backward/left/right and the other was to control a conveyor on the top which we had to remove and send to a salesman later. It uses Zigbee (like the last one) to control the AGV. I did design this one as well, but I had a third part do the milling as I had some square holes as well as holes larger than our available holes saw.
AGV Controller Rev 2 picture
The AGV is also bluetooth controlled via an Android App I wrote after going to the Marakana Android school
https://play.google.com/store/apps/details?id=com.md.bluetooth.agv
Motor Mount Encoders
We to make some motor mount encoders. The idea is to mount directly to the shaft of the backend of the motor and you would ziptie the cord of the encoder to keep it in place. We offered single and quadrature options. We designed a style in solid works, then had a representation of the encoder CNC’d out of metal to assist me in making molds.
Mold Rev 1:
I built mold rev1 from silicone, it was my first time doing something like this. Mold rev 1 was very thick and used screws for keying. I also used some screws or wires for the air and pour holes. It did its job, but not very well. The pour and air holes were too small and not connected very well because they were put in after. Still it got the proof of concept to work, I poured a few sets of encoders, all using polyurethane for their base.
Mold Rev 1 picture
Mold Rev 2:
To fix pour issues from Mold Rev 1, we remade the model to include air and pour lines. This helped me make Mold Rev 2. I used hexagonal spacers for keying. This mold worked very well and I did probably 5-6 pours to get more prototypes ready. The black encoder pictured below was actually poured from this mold. The quality is pretty good. It was one of several polyurethanes I was trying and was my favorite as it still had a slightly soft feel when done and didn’t have too many bubble issues. The Green encoder is one professionally made once we submitted our drawings to an injection molder. We are still in process working out quality issues with them. The last hole shows the circuit board that goes into the mold.
Mold Rev 2 picture with finished and unfinished encoders
SwitchBox
I never have enough reliable switches and potentiometers around. I often have to hunt for working ones and then attach new wires to fit what purpose I was using them for. After being fed up for the last time, I decided to make a multipurpose switchbox.
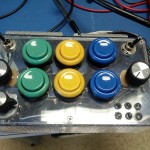
I designed the box below in Autocad then drilled everything out on a drill press. It features two 2-way toggle switches (upper left and right corners), one three way rotary switch (bottom left), six NO and NC Arcade pushbuttons (center), two 5k potentiometers (left and right sides), and six constant current LED’s which can be given 2.7-30 some VDC. I use LM317’s in constant current configuration for this. Below is the face for the Switch Box.
SwitchBox face picture
The top of the SwitchBox contains all my connections, all wago terminal blocks that you use a screwdriver in the top slot to put in your wire in the bottom hole. These terminal blocks will last a lot longer and hold a lot better than screw terminal blocks. Everything is labeled with marker, which is hard to see, and I made a whole lot of tinned jumper wires to connect to this to save myself time. This box really came in handy when I was designing the logic board for a door opener, which has a ton of inputs to it. But the main goal was to end frustration finding/repairing/putting wires on and getting shocked by my components.
SwitchBox Connections picture


